Getting Started
MapmyIndia Vector Maps SDK for IOS lets you easily add MapmyIndia Maps and web services to your own iOS app. MapmyIndia Maps SDK for iOS supports iOS SDK 9.0 and above and Xcode 10.1 or later. You can have a look at the map and features you will get in your own app by using the MapmyIndia Maps app for iOS. The SDK handles map tiles download and their display along with a bunch of controls and native gestures.
API Usage
Your MapmyIndia Vector Maps SDK usage needs a set of license keys (get them here ) and is governed by the API terms and conditions.
As part of the terms and conditions, you cannot remove or hide the MapmyIndia logo and copyright information in your project.
Please see branding guidelines on MapmyIndia website for more details.
The allowed SDK hits are described on the plans page. Note that your usage is
shared between platforms, so the API hits you make from a web application, Android app or an iOS app all add up to your allowed daily limit.
Setup your Project
Create a new project in Xcode.
-
Install libraries to your project which can be done in two ways either Manual or using Cocoapods.
Manual Procedure:
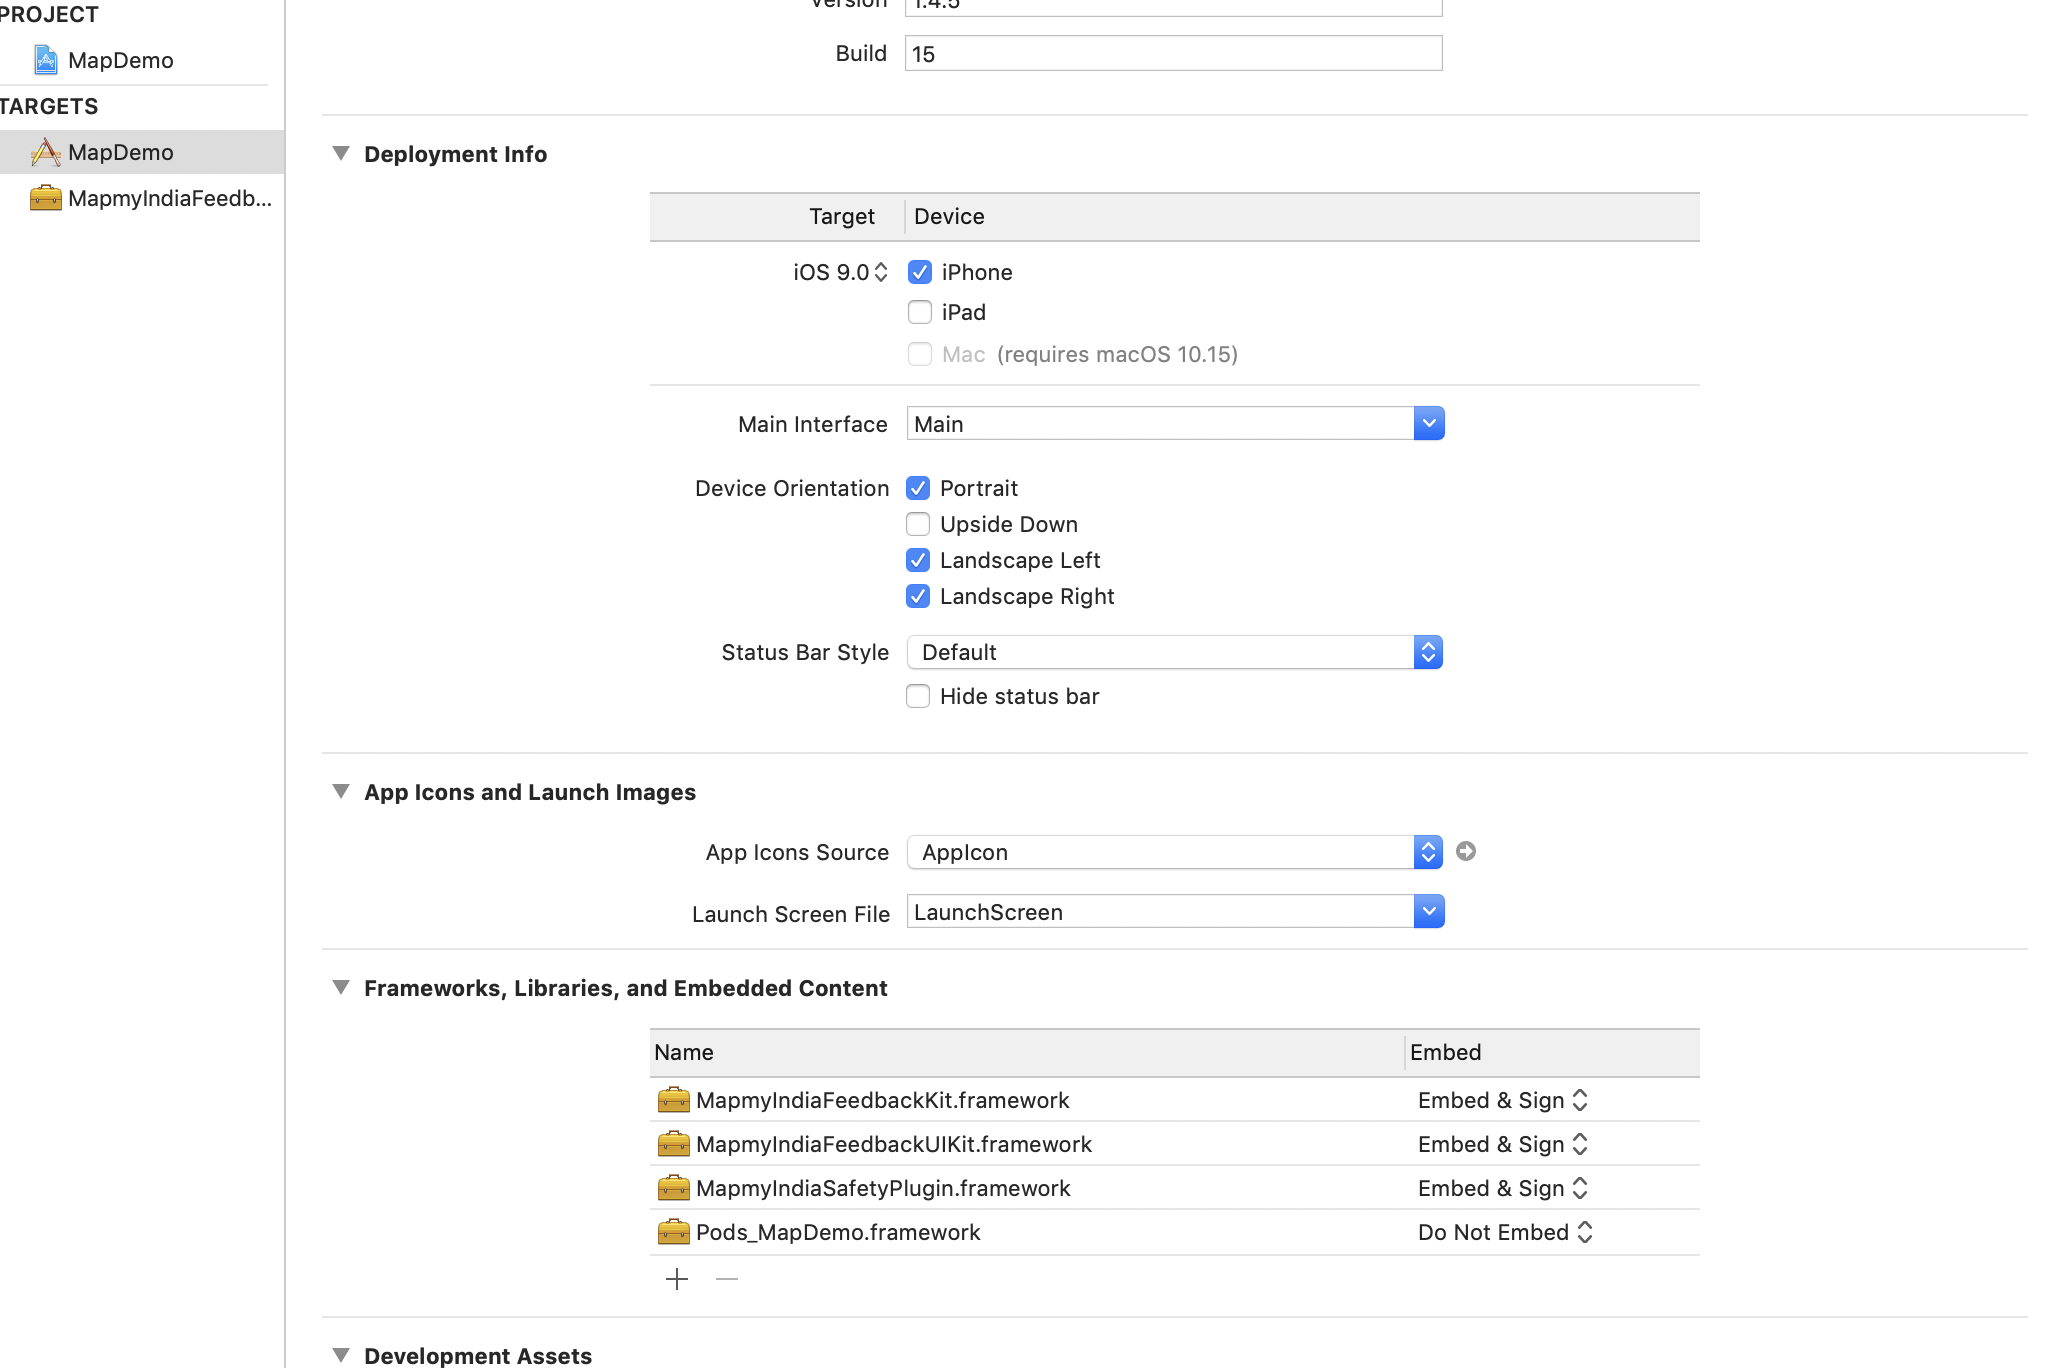
- Drag and drop the MapmyIndia Map SDK Framework (Mapbox.framework) to your project. It must be added in embedded binaries.
- Drag and drop the MapmyIndiaAPIKit Framework to your project. It must be added in embedded binaries. It is a dependent framework.
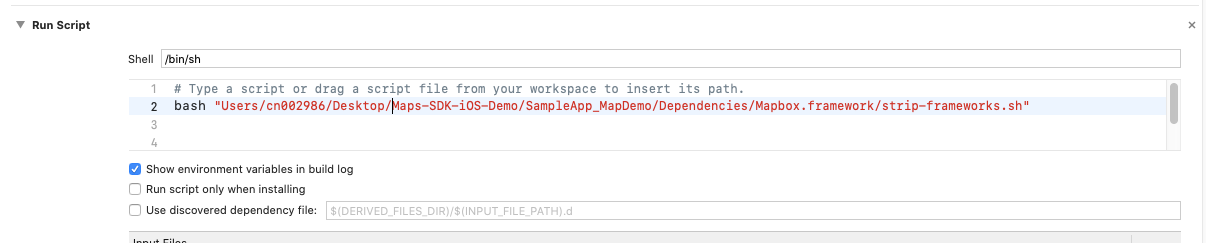
- In the Build Phases tab of the project editor, click the + button at the top and select .New Run Script Phase.. Enter the following code into the script text field: bash ${BUILT_PRODUCTS_DIR}/${FRAMEWORKS_FOLDER_PATH}/Mapbox.framework/strip-frameworks.sh
Note: History of frameworks can be found here
Cocoapods:
- Add below lines in pod file of your project:
pod 'MapmyIndiaAPIKit'
pod 'MapmyIndiaMaps'
pod 'MapmyIndiaDirections'
- Run pod install or pod update (to update existing pods)
Note: History of Cocoapods can be found here
-
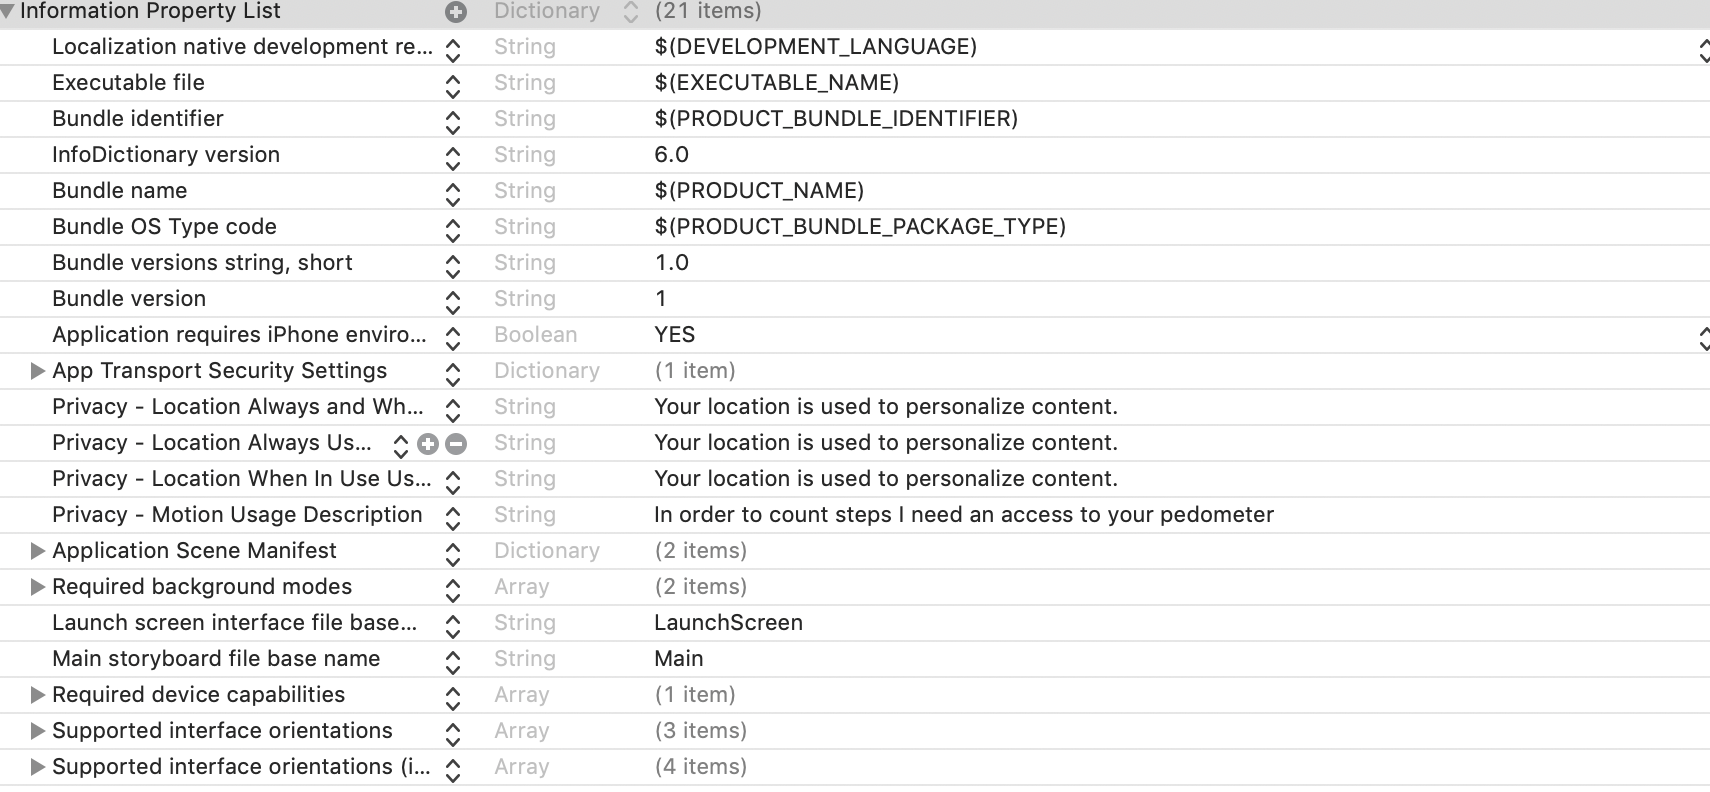
For iOS9 or later, make this change to your
info.plist (Project target > info.plist > Add row and set key NSLocationWhenInUseUsageDescription, NSLocationAlwaysUsageDescription)
Add your MapmyIndia Map API keys to your AppDelegate as follows
- Add the following import statement.
#import <MapmyIndiaAPIKit/MapmyIndiaAPIKit.h>
- Add the following import statement:
To initialize SDK you have to set required keys. You can achieve this using
two ways:
First Way (Preferred)
By adding following keys in Info.plist file of your project MapmyIndiaSDKKey, MapmyIndiaRestKey, MapmyIndiaAtlasClientId, MapmyIndiaAtlasClientSecret, MapmyIndiaAtlasGrantType.
Second Way
You can also set these required keys programmatically.
Add the following to your application:didFinishLaunchingWithOptions: method, replacing restAPIKey and mapSDKKey with your own API keys:
[MapmyIndiaAccountManager setMapSDKKey:@"MAP SDK_KEY"];
[MapmyIndiaAccountManager setRestAPIKey:@"REST API_KEY"];
[MapmyIndiaAccountManager setAtlasClientId:@"ATLAS CLIENT_ID"];
[MapmyIndiaAccountManager setAtlasClientSecret:@"ATLAS CLIENT_SECRET"];
[MapmyIndiaAccountManager setAtlasGrantType:@"GRANT_TYPE"]; //always put client_credentials
[MapmyIndiaAccountManager setAtlasAPIVersion:@"1.3.11"]; // Optional; deprecated
MapmyIndiaAccountManager.setMapSDKKey("MAP SDK_KEY")
MapmyIndiaAccountManager.setRestAPIKey("REST API_KEY")
MapmyIndiaAccountManager.setAtlasClientId("ATLAS CLIENT_ID")
MapmyIndiaAccountManager.setAtlasClientSecret("ATLAS CLIENT_SECRET")
MapmyIndiaAccountManager.setAtlasGrantType("GRANT_TYPE") //always put client_credentials
MapmyIndiaAccountManager.setAtlasAPIVersion("1.3.11") // Optional; deprecated
Add a MapmyIndia Map
Map View on view controller can be added either using interface builder or programmatically.
By Interface Builder
In a storyboard, add a view to your View Controller. In the Identity inspector, change its class to MapmyIndiaMapView.
Note :- Map style url need to be set at the time of load map
By Programmatically
To add map on view Controller create an instance of MapmyIndiaMapView. and add this to view of ViewController.
#import
@interface ViewController () <MapmyIndiaMapViewDelegate>
@end
@implementation ViewController
import Mapbox
class ViewController: UIViewController, MapmyIndiaMapViewDelegate {
override func viewDidLoad() {
super.viewDidLoad()
let mapView = MapmyIndiaMapView(frame: view.bounds)
mapView.autoresizingMask = [.flexibleWidth, .flexibleHeight]
view.addSubview(mapView)
}
});
Note Also add app transport security exception in Info.plist of your project.
Example: NSAppTransportSecurity NSAllowsArbitraryLoads
Map Interactions
Set Zoom Level
Set zoom to 4 for country level display and 18 for house number display.
Set Map Center
To set Center of map reference code is below:
[self.mapView setCenterCoordinate: CLLocationCoordinate2DMake(28.551438, 77.265119)];
mapView.centerCoordinate = CLLocationCoordinate2DMake(28.551438, 77.265119)
Map Features
Current Location
To show user's current location on map, use property .showsUserLocation. and set its value to true.
mapView.showsUserLocation = YES;
mapView.showsUserLocation = true
Tracking Mode
To move map with user location change use property userTrackingMode. Its an enum property of type .MGLUserTrackingMode.. You can set any value from following:
- followWithCourse
- followWithHeading
- none
self.mapView.userTrackingMode = MGLUserTrackingModeFollowWithCourse;
mapView.userTrackingMode = .followWithCourse
Map Events
The Map object should implement the methods of the MapmyIndiaMapViewDelegate protocol corresponding to the events you wish it to receive. This delegate can also be used to detect map overlays selection. Delegate handles gesture events, tap on annotation (marker) and map center coordinates.
Map Position Changes Events
-(BOOL)mapView:(MGLMapView *)mapView shouldChangeFromCamera:(MGLMapCamera*)oldCamera toCamera:(MGLMapCamera *)newCamera;
-(BOOL)mapView:(MGLMapView *)mapView shouldChangeFromCamera:(MGLMapCamera*)oldCamera toCamera:(MGLMapCamera *)newCamera reason:(MGLCameraChangeReason)reason;
-(void)mapView:(MGLMapView *)mapView regionWillChangeAnimated:(BOOL)animated;
-(void)mapView:(MGLMapView *)mapView regionWillChangeWithReason:(MGLCameraChangeReason)reason animated:(BOOL)animated;
-(void)mapViewRegionIsChanging:(MGLMapView *)mapView;
-(void)mapView:(MGLMapView *)mapView regionIsChangingWithReason:(MGLCameraChangeReason)reason;
-(void)mapView:(MGLMapView *)mapView regionDidChangeAnimated:(BOOL)animated;`
-(void)mapView:(MGLMapView *)mapView regionDidChangeWithReason:(MGLCameraChangeReason)reason animated:(BOOL)animated;
Loading the Map Events
-(void)mapViewWillStartLoadingMap:(MGLMapView *)mapView;
-(void)mapViewDidFinishLoadingMap:(MGLMapView *)mapView;
-(void)mapViewDidFailLoadingMap:(MGLMapView *)mapView withError:(NSError*)error;
-(void)mapViewWillStartRenderingMap:(MGLMapView *)mapView;
-(void)mapViewWillStartRenderingFrame:(MGLMapView *)mapView;
-(void)mapViewDidFinishRenderingFrame:(MGLMapView *)mapView fullyRendered:(BOOL)fullyRendered;
-(void)mapView:(MGLMapView *)mapView didFinishLoadingStyle:(MGLStyle*)style;
Tracking User Location Events
-(void)mapViewWillStartLocatingUser:(MGLMapView *)mapView;
-(void)mapViewDidStopLocatingUser:(MGLMapView *)mapView;
-(void)mapView:(MGLMapView *)mapView didUpdateUserLocation:(nullableMGLUserLocation *)userLocation;
-(void)mapView:(MGLMapView *)mapView didFailToLocateUserWithError:(NSError*)error;
-(void)mapView:(MGLMapView *)mapView didChangeUserTrackingMode:(MGLUserTrackingMode)mode animated:(BOOL)animated;
Appearance of Annotations Events
-(nullable MGLAnnotationImage *)mapView:(MGLMapView *)mapView imageForAnnotation:(id <MGLAnnotation>)annotation;
-(CGFloat)mapView:(MGLMapView *)mapView alphaForShapeAnnotation:(MGLShape*)annotation;
-(UIColor *)mapView:(MGLMapView *)mapView strokeColorForShapeAnnotation:(MGLShape *)annotation;
-(UIColor *)mapView:(MGLMapView *)mapView fillColorForPolygonAnnotation:(MGLPolygon *)annotation;
-(CGFloat)mapView:(MGLMapView *)mapView lineWidthForPolylineAnnotation:(MGLPolyline *)annotation;
Annotation Views Events
-(nullable MGLAnnotationView *)mapView:(MGLMapView *)mapView viewForAnnotation:(id <MGLAnnotation>)annotation;
-(void)mapView:(MGLMapView *)mapView didAddAnnotationViews: (NS_ARRAY_OF(MGLAnnotationView *) *)annotationViews;
Selecting Annotations Events
-(void)mapView:(MGLMapView *)mapView didSelectAnnotation:(id <MGLAnnotation>)annotation;
-(void)mapView:(MGLMapView *)mapView didDeselectAnnotation:(id <MGLAnnotation>)annotation;
-(void)mapView:(MGLMapView *)mapView didSelectAnnotationView: (MGLAnnotationView *)annotationView;
-(void)mapView:(MGLMapView *)mapView didDeselectAnnotationView: (MGLAnnotationView *)annotationView;
Callout Views Events
-(BOOL)mapView:(MGLMapView *)mapView annotationCanShowCallout:(id <MGLAnnotation>)annotation;
-(nullable id <MGLAnnotation>)mapView:(MGLMapView *)mapView calloutViewForAnnotation:(id <MGLAnnotation>)annotation;
-(nullable UIView *)mapView:(MGLMapView *)mapView leftCalloutAccessoryViewForAnnotation:(id <MGLAnnotation>)annotation;
-(nullable UIView *)mapView:(MGLMapView *)mapView rightCalloutAccessoryViewForAnnotation:(id <MGLAnnotation>)annotation;
-(void)mapView:(MGLMapView *)mapView annotation:(id <MGLAnnotation>)annotation calloutAccessoryControlTapped:(UIControl *)control;
-(void)mapView:(MGLMapView *)mapView tapOnCalloutForAnnotation:(id <MGLAnnotation>)annotation;
Map Tap Events
Single Tap Gesture
To capture single tap on map events add a tap gesture to instance of MapmyIndiaMapView. Tapped CGPoint on map can be converted to CLLocationCoordinate object. Also if there is any mareker in tapped area that can also be retrieved. Code for reference to explain above features is below:
UITapGestureRecognizer *singleTap = [[UITapGestureRecognizer alloc]
initWithTarget:self action:@selector(didTapPress:)];
[self.mapView addGestureRecognizer:singleTap];
-(void)didTapPress:(UILongPressGestureRecognizer *)gesture {
if(UIGestureRecognizerStateEnded == gesture.state) {
CGPoint touchPoint = [sender locationInView:self.mapView];
// Convert tapped area point to a CLLocationCoordinate object
CLLocationCoordinate2D location = [self.mapView convertPoint:touchPoint toCoordinateFromView:self.mapView;
// Also existing annotation or features can be checked on tapped area point
NSArray<id <MGLFeature>> * visibleFeatures = [self.mapView visibleFeaturesAtPoint: touchPoint];
if (visibleFeatures.count > 0) {
}
}
}
let singleTap = UITapGestureRecognizer(target: self, action:
#selector(didTapMap(tap:)))
mapView.addGestureRecognizer(singleTap)
@objc func didTapMap(tap: UITapGestureRecognizer) {
if tap.state == .ended {
let point = tap.location(in: mapView)
// Convert tapped area point to a CLLocationCoordinate object
let coordinate = mapView.convert(point, toCoordinateFrom: mapView)
// Also existing annotation or features can be checked on tapped area point
let visibleFeatures = mapView.visibleFeatures(at: point)
if visibleFeatures.count > 0 {
}
}
}
Long Tap Gesture
To capture long press on map events add a long press gesture to instance of MapmyIndiaMapView.
UILongPressGestureRecognizer *longPress = [[UILongPressGestureRecognizer
alloc] initWithTarget:self action:@selector(didLongPress:)];
[longPress setMinimumPressDuration:1.0];
[self.mapView addGestureRecognizer:longPress];
-(void)didLongPress:(UILongPressGestureRecognizer *)gesture {
if(UIGestureRecognizerStateEnded == gesture.state) {
CGPoint touchPoint = [sender locationInView:self.mapView];
// Convert tapped area point to a CLLocationCoordinate object
CLLocationCoordinate2D location = [self.mapView convertPoint:touchPoint toCoordinateFromView:self.mapView;
// Also existing annotation or features can be checked on tapped area point
NSArray<id <MGLFeature>> * visibleFeatures = [self.mapView visibleFeaturesAtPoint: touchPoint];
if (visibleFeatures.count > 0) {
}
}
}
let longPress = UILongPressGestureRecognizer(target: self, action:
#selector(didLongPress(tap:)))
mapView.addGestureRecognizer(longPress)
@objc func didLongPress(tap: UILongPressGestureRecognizer) {
if tap.state == .ended {
let point = tap.location(in: mapView)
// Convert tapped area point to a CLLocationCoordinate object
let coordinate = mapView.convert(point, toCoordinateFrom: mapView)
// Also existing annotation or features can be checked on tapped area point
let visibleFeatures = mapView.visibleFeatures(at: point)
if visibleFeatures.count > 0 {
}
}
}
Map Overlays
Add marker
To show an annotation on map create an instance of MGLPointAnnotation and add that object to instance of MapmyIndiaMapView using method addAnnotation..
After creating instance of MGLPointAnnotation, set coordinate and title property values.
MGLPointAnnotation *point = [[MGLPointAnnotation alloc] init];
point.coordinate = CLLocationCoordinate2DMake(28.550834, 77.268918);
point.title = @"Annotation";
[self.mapView addAnnotation:point];
var point = MGLPointAnnotation()
point.coordinate = CLLocationCoordinate2D(latitude: 28.550834, longitude: 77.268918)
point.title = "Annotation"
mapView.addAnnotation(point)
Remove a marker
[self.mapView removeAnnotation:point];
mapView.removeAnnotation(point)
Custom Marker (Change Default Marker Icon)
To change image for default marker you can use delegate methods of protocol
MapmyIndiaMapViewDelegate.
Either you can override whole view of marker by using below method of delegate:
-(nullable MGLAnnotationView *)mapView:(MGLMapView *)mapView viewForAnnotation:(id <MGLAnnotation>)annotation;
or you can override image of marker by using below method of delegate:
-(nullable MGLAnnotationImage *)mapView:(MGLMapView *)mapView imageForAnnotation:(id <MGLAnnotation>)annotation;
or you can override image of marker by using below method of delegate:
- (nullable MGLAnnotationImage *)mapView:(MGLMapView *)mapView
imageForAnnotation:(id <MGLAnnotation>)annotation;
Show Info Window (Callout)
To enable info window on tap of marker return true from below delegate method:
- (BOOL)mapView:(MGLMapView *)mapView annotationCanShowCallout:(id <MGLAnnotation>)annotation;
Custom Info Window(#Custom-Info-Window)
To change default callout view of annotation use delegate function of MapmyIndiaMapViewDelegate. protocol and return custom view of callout from that function.
func mapView(_ mapView: MGLMapView, calloutViewFor annotation:
MGLAnnotation) -> MGLCalloutView? {
return CustomCalloutView(representedObject: annotation)
}
To create custom callout view create a class inherited from .MGLCalloutView. and .UIView.. Override draw function of UIView to design your own callout view.
Polylines
Add a Polyline
To show a polyline on map create an instance of MGLPolyline and add that object to instance of MGLMapView using method .addAnnotation..
To create instance of MGLPolyline an array of CLLocationCoordinate2D will be required so first create an array of CLLocationCoordinate2D.
CLLocationCoordinate2D coordinates[] = {
CLLocationCoordinate2DMake(28.550834, 77.268918),
CLLocationCoordinate2DMake(28.551059, 77.268890),
CLLocationCoordinate2DMake(28.550938, 77.267641),
CLLocationCoordinate2DMake(28.551764, 77.267575),
CLLocationCoordinate2DMake(28.552068, 77.267599),
CLLocationCoordinate2DMake(28.553836, 77.267450),
};
NSUInteger numberOfCoordinates = sizeof(coordinates) / sizeof(CLLocationCoordinate2D);
MGLPolyline *polyline = [MGLPolyline polylineWithCoordinates:coordinates count:numberOfCoordinates];
[self.mapView addAnnotation:polyline];
var coordinates = [
CLLocationCoordinate2D(latitude: 28.550834, longitude: 77.268918),
CLLocationCoordinate2D(latitude: 28.551059, longitude: 77.268890),
CLLocationCoordinate2D(latitude: 28.550938, longitude: 77.267641),
CLLocationCoordinate2D(latitude: 28.551764, longitude: 77.267575),
CLLocationCoordinate2D(latitude: 28.552068, longitude: 77.267599),
CLLocationCoordinate2D(latitude: 28.553836, longitude: 77.267450),
]
let polyline = MGLPolyline(coordinates: &coordinates, count: UInt(coordinates.count))
mapView.addAnnotation(polyline)
Remove a Polyline
[self.mapView removeAnnotation:polyline];
mapView.removeAnnotation(polyline)
Polyline Width
Line width in points can be set when rendering the outline of a polyline annotation. It cab be achieve by using delegate method lineWidthForPolylineAnnotation.
By default, the polyline is outlined with a line 3.0 points wide.
- (CGFloat)mapView:(MGLMapView *)mapView lineWidthForPolylineAnnotation:(MGLPolyline *)annotation
{
return 10.0;
}
func mapView(_ mapView: MGLMapView, lineWidthForPolylineAnnotation annotation: MGLPolyline) -> CGFloat {
return 10.0
}
mapView.removeAnnotation(polyline)
Line width in points can be set when rendering the outline of a polyline annotation. It cab be achieve by using delegate method lineWidthForPolylineAnnotation.
By default, the polyline is outlined with a line 3.0 points wide.
- (CGFloat)mapView:(MGLMapView *)mapView lineWidthForPolylineAnnotation:(MGLPolyline *)annotation
{
return 10.0;
}
func mapView(_ mapView: MGLMapView, lineWidthForPolylineAnnotation annotation: MGLPolyline) -> CGFloat {
return 10.0
}
Polygons
Add a Polygon
To show a polygon on map create an instance of MGLPolygon and add that object to instance of MGLMapView using method .addAnnotation..
To create instance of MGLPolygon an array of CLLocationCoordinate2D will be required so first create an array of CLLocationCoordinate2D.
Example
CLLocationCoordinate2D coordinates[] = {
CLLocationCoordinate2DMake(28.550834, 77.268918),
CLLocationCoordinate2DMake(28.551059, 77.268890),
CLLocationCoordinate2DMake(28.550938, 77.267641),
CLLocationCoordinate2DMake(28.551764, 77.267575),
CLLocationCoordinate2DMake(28.552068, 77.267599),
CLLocationCoordinate2DMake(28.553836, 77.267450),
};
NSUInteger numberOfCoordinates = sizeof(coordinates) / sizeof(CLLocationCoordinate2D);
MGLPolygon *polygon = [MGLPolygon polygonWithCoordinates:coordinates count:numberOfCoordinates];//
[self.mapView addAnnotation:polygon];
var coordinates = [
CLLocationCoordinate2D(latitude: 28.550834, longitude: 77.268918),
CLLocationCoordinate2D(latitude: 28.551059, longitude: 77.268890),
CLLocationCoordinate2D(latitude: 28.550938, longitude: 77.267641),
CLLocationCoordinate2D(latitude: 28.551764, longitude: 77.267575),
CLLocationCoordinate2D(latitude: 28.552068, longitude: 77.267599),
CLLocationCoordinate2D(latitude: 28.553836, longitude: 77.267450),
]
let polygon = MGLPolygon(coordinates: &coordinates, count: UInt(coordinates.count))
mapView.addAnnotation(polygon)
Remove a Polygon
[self.mapView removeAnnotation:polygon];
mapView.removeAnnotation(polygon)
Map Camera
Fit Map Camera
showAnnotations function sets the visible region so that the map displays the specified annotations.
mapView.showAnnotations(annotations, animated: true)
Create Camera For Shape
A camera object that best fits the given shape with some additional padding on each side while looking in the specified direction can be retrieved using function cameraThatFitsShape of MapmyIndiaMapView.
After creating a camera object using above function it can be set to fit map visible area.
CLLocationCoordinate2D coordinates[] = {
CLLocationCoordinate2DMake(28.550834, 77.268918),
CLLocationCoordinate2DMake(28.551059, 77.268890),
CLLocationCoordinate2DMake(28.550938, 77.267641),
CLLocationCoordinate2DMake(28.551764, 77.267575),
CLLocationCoordinate2DMake(28.552068, 77.267599),
CLLocationCoordinate2DMake(28.553836, 77.267450),
};
NSUInteger numberOfCoordinates = sizeof(coordinates) / sizeof(CLLocationCoordinate2D);
MGLPolygon *polygon = [MGLPolygon polygonWithCoordinates:coordinates count:numberOfCoordinates];//
[self.mapView addAnnotation:polygon];
MGLMapCamera *shapeCam = [self.mapView cameraThatFitsShape:polygon direction:(0) edgePadding:UIEdgeInsetsMake(20, 20, 20, 20)];
[self.mapView setCamera:shapeCam];
var coordinates = [
CLLocationCoordinate2D(latitude: 28.550834, longitude: 77.268918),
CLLocationCoordinate2D(latitude: 28.551059, longitude: 77.268890),
CLLocationCoordinate2D(latitude: 28.550938, longitude: 77.267641),
CLLocationCoordinate2D(latitude: 28.551764, longitude: 77.267575),
CLLocationCoordinate2D(latitude: 28.552068, longitude: 77.267599),
CLLocationCoordinate2D(latitude: 28.553836, longitude: 77.267450),
]
let polyline = MGLPolyline(coordinates: &coordinates, count: UInt(coordinates.count))
let shapeCam = mapView.cameraThatFitsShape(polyline, direction: CLLocationDirection(0), edgePadding: UIEdgeInsets(top: 20, left: 20, bottom: 20, right: 20))
mapView.setCamera(shapeCam, animated: false)
Miscellaneous
Shape Stroke Color
Color of polyline and stroke color of polygon can be changed by using delegate method strokeColorForShapeAnnotation.
The default stroke color is the map view’s tint color.
- (UIColor *)mapView:(MGLMapView *)mapView strokeColorForShapeAnnotation:(MGLShape *)annotation {
return [UIColor redColor];
}
func mapView(_ mapView: MGLMapView, strokeColorForShapeAnnotation annotation: MGLShape) -> UIColor {
return .red
}
Shape Fill Color
Fill Color of polygon can be changed by using delegate method fillColorForPolygonAnnotation.
The default fill color is the map view’s tint color.
- (UIColor *)mapView:(MGLMapView *)mapView fillColorForPolygonAnnotation:(MGLPolygon *)annotation {
return [UIColor redColor];
}
func mapView(_ mapView: MGLMapView, fillColorForPolygonAnnotation annotation: MGLPolygon) -> UIColor {
return UIColor.red
}
Shape Opacity
To change opacity of a shape i.e polyline or polygon, delegate method alphaForShapeAnnotation can be used.
It sets the opacity of an entire shape, inclusive of its stroke and fill.
- (CGFloat)mapView:(MGLMapView *)mapView alphaForShapeAnnotation:(MGLShape *)annotation
{
return 0.5;
}
func mapView(_ mapView: MGLMapView, alphaForShapeAnnotation annotation: MGLShape) -> CGFloat {
return 0.5
}
Safety Status Strip
A safety status strip can be show on map based on user's location. COVID-19 status will be shown on map currently, It will show whether user's location lies in a containment zone or not and conaintment zone info like Containment Zone Name, District etc. For more info about how to use go to Safety Strip.
Cluster Based Authentication
Map SDK can be configured such that it can work only for specified unique identifier of a device and will show an error accordingly.
Set Cluster Device
Cluster Identifier can be set and retrieve using singelton class MapmyIndiaAccountManager which is part of Map SDK's dependency MapmyIndiaAPIKit.
Below is code for reference to set and get cluster identifier.
// Set Cluster Identifier
[MapmyIndiaAccountManager setClusterId:@"YOUR_CLUSTER_DEVICE_IDENTIFIER"];
// Get Cluster Identifier
NSString * clusterId = [MapmyIndiaAccountManager clusterId];
// Set Cluster Identifier
MapmyIndiaAccountManager.setClusterId("YOUR_CLUSTER_DEVICE_IDENTIFIER")
// Get Cluster Identifier
let clusterId = MapmyIndiaAccountManager.clusterId()
REST APIs
Autosuggest
For live demo click LIVE DEMO
Get "type as you go" suggestion while searching for a location.
The Autosuggest API helps users to complete queries faster by adding intelligent search capabilities to your web or mobile app. This API returns a list of results as well as suggested queries as the user types in the search field.
The Autosuggest helps users to complete queries faster by adding intelligent search capabilities to your iOS mobile app. It takes a human readable query such as place name, address or eLoc and returns a list of results.
Class used for Autosuggest search is MapmyIndiaAutoSuggestManager. Create a MapmyIndiaAutoSuggestManager object using your rest key or alternatively, you can place your rest key in the MapmyIndiaRestKey key of your application's Info.plist file, then use the shared instance of MapmyIndiaAutoSuggestManager class.
To perform auto suggest use MapmyIndiaAutoSearchAtlasOptions class to pass query parameter to get auto suggest search with an option to pass region in parameter withRegion, which is an enum of type MMIRegionTypeIdentifier. If no value is passed for region, It will take default value which is India.
MMIRegionTypeIdentifier is used to validate and get result for different countries. Currently five countries are supported including India which are Sri Lanka, India, Bhutan, Bangladesh, Nepal.
Additionally you can also set location and restriction filters in object of MapmyIndiaAutoSearchAtlasOptions.
Request Parameters
-
location: Location is required to get location bias autosuggest results.
-
zoom: takes the zoom level of the current scope of the map (min: 4, max: 18).
-
includeTokenizeAddress: On setting value of this property to true it provides the different address attributes in a structured object in response.
-
pod: It takes place type which helps in restricting the results to certain chosen type
Below mentioned are the codes for the pod -
- Sublocality
- Locality
- City
- Village
- Subdistrict
- District
- State
- Subsublocality
-
filter: this helps you restrict the result either by mentioning a bounded area or to certain eLoc. Below mentioned are the both types whose instance can be set to this parameter -
- (a) MapmyIndiaElocFilter: to filter results on basis of eLoc
- (b) MapmyIndiaBoundsFilter: to filter results on basis of geo bound.
Response Parameters
In response of auto suggest search either you will receive an error or an array of MapmyIndiaAtlasSuggestion, Where MapmyIndiaAtlasSuggestion is derived from MapmyIndiaSuggestion class. Yo will find below useful properties in suggestion object :
-
type: type of location POI or Country or City
-
eLoc: Place Id of the location 6-char alphanumeric.
- placeAddress: Address of the location.
-
latitude: Latitude of the location.
-
longitude: longitude of the location.
-
entranceLatitude: entry latitude of the location
-
entrancelongitude: entry longitude of the location
-
placeName: Name of the location.
-
orderIndex: the order where this result should be placed
-
addressTokens:
houseNumber: house number of the location.
houseName: house name of the location.
poi: name of the POI (if applicable)
street: name of the street. (if applicable)
subSubLocality: the sub-sub-locality to which the location belongs. (if applicable)
subLocality: the sub-locality to which the location belongs. (if applicable)
locality: the locality to which the location belongs. (if applicable)
village: the village to which the location belongs. (if applicable)
subDistrict: the sub-district to which the location belongs. (if applicable)
district: the district to which the location belongs. (if applicable)
city: the city to which the location belongs. (if applicable)
state: the state to which the location belongs. (if applicable)
pincode: the PIN code to which the location belongs. (if applicable)
Code Samples
MapmyIndiaAutoSuggestManager * autoSuggestManager =
[MapmyIndiaAutoSuggestManager sharedManager]
// or
MapmyIndiaAutoSuggestManager *autoSearchManager =
[[MapmyIndiaAutoSuggestManager alloc]
initWithRestKey:MapmyIndiaAccountManager.restAPIKey
clientId:MapmyIndiaAccountManager.atlasClientId
clientSecret:MapmyIndiaAccountManager.atlasClientSecret
grantType:MapmyIndiaAccountManager.atlasGrantType]
MapmyIndiaAutoSearchAtlasOptions * autoSuggestOptions =
[[MapmyIndiaAutoSearchAtlasOptions alloc] initWithQuery:@"mmi000"
withRegion:MMIRegionTypeIdentifierDefault];
[autoSuggestManager getAutoSuggestionsWithOptions:autoSearchOptions
completionHandler:^(NSArray<MapmyIndiaAtlasSuggestion *> * _Nullable
suggestions, NSError * _Nullable error) {
if (error) {
NSLog(@"%@", error);
} else if (suggestions.count > 0) {
NSLog(@"Auto Suggest %@%@",
suggestions[0].latitude,suggestions[0].longitude);
self.resultsLabel.text = suggestions[0].placeAddress;
} else {
self.resultsLabel.text = @"No results";
}
}];
let autoSuggestManager = MapmyIndiaAutoSuggestManager.shared
//Or
let autoSuggestManager = MapmyIndiaAutoSuggestManager(restKey:
MapmyIndiaAccountManager.restAPIKey(), clientId:
MapmyIndiaAccountManager.atlasClientId(), clientSecret:
MapmyIndiaAccountManager.atlasClientSecret(), grantType:
MapmyIndiaAccountManager.atlasGrantType())
let autoSuggestOptions = MapmyIndiaAutoSearchAtlasOptions(query: "mmi000",
withRegion: .india)
autoSuggestOptions.location = CLLocation(latitude: 28.2323234, longitude: 72.3434123)
autoSuggestOptions.zoom = 5
autoSuggestManager.getAutoSuggestions(autoSuggestOptions) { (suggestions, error) in
if let error = error {
NSLog("%@", error)
} else if let suggestions = suggestions, !suggestions.isEmpty {
print("Auto Suggest: \(suggestions[0].latitude ?? 0),\
(suggestions[0].longitude ?? 0)")
self.resultsLabel.text = suggestions[0].placeAddress
} else {
self.resultsLabel.text = "No results"
}
}
For more details visit our online documentation.
Reverse Geocoding API
For live demo click LIVE DEMO
Get the nearest address for a given lat long combination
Reverse Geocoding is a process to give the closest matching address to a provided geographical coordinates (latitude/longitude). MapmyIndia reverse geocoding API provides real addresses along with nearest popular landmark for any such geo-positions on the map.
Class used for geocode is MapmyIndiaReverseGeocodeManager. Create a MapmyIndiaReverseGeocodeManager object using your rest key or alternatively, you can place your rest key in the MapmyIndiaRestKey key of your application's Info.plist file, then use the shared instance of MapmyIndiaReverseGeocodeManager class.
To perform the translation use MapmyIndiaReverseGeocodeOptions class to pass coordinates as parameters to reverse geocode with an option to pass region in parameter withRegion, which is an enum of type MMIRegionTypeIdentifier. If no value is passed for region, It will take default value which is India.
MMIRegionTypeIdentifier is used to validate and get result for different countries. Currently five countries are supported including India which are Sri Lanka, India, Bhutan, Bangladesh, Nepal.
Response Parameters
In response of geocode search either you will receive an error or an array of MapmyIndiaGeocodedPlacemark. Yo will find below useful properties in suggestion object:
-
houseNumber: The house number of the location.
-
houseName: The name of the location.
-
poi: The name of the POI if the location is a place of interest (POI).
-
poiDist: distance from nearest POI in metres.
-
street: The name of the street of the location.
-
streetDist: distance from nearest Street in metres.
-
subSubLocality: The name of the sub-sub-locality where the location exists.
-
subLocality: The name of the sub-locality where the location exists.
-
locality: The name of the locality where the location exists.
-
village: The name of the village if the location exists in a village.
-
district: The name of the district in which the location exists.
-
subDistrict: The name of the sub-district in which the location exists.
-
city: The name of the city in which the location exists.
-
state: The name of the state in which the location exists.
-
pincode: The pin code of the location area.
-
latitude: The latitude of the location.
-
longitude: The longitude of the location.
-
formattedAddress: The complete human readable address string that is usually the complete postal address of the result.
-
area: in-case the co-ordinate lies in a country the name of the country would be returned or if the co-ordinate lies in an ocean, the name of the ocean will be returned.
Code Samples
MapmyIndiaReverseGeocodeManager * reverseGeocodeManager =
[MapmyIndiaReverseGeocodeManager sharedManager];
//Or
MapmyIndiaReverseGeocodeManager * reverseGeocodeManager =
[[MapmyIndiaReverseGeocodeManager alloc]
initWithRestKey:MapmyIndiaAccountManager.restAPIKey];
MapmyIndiaReverseGeocodeOptions *revOptions
=[[MapmyIndiaReverseGeocodeOptions alloc]
initWithCoordinate:self.mapView.centerCoordinate
withRegion:MMIRegionTypeIdentifierDefault];
[reverseGeocodeManager reverseGeocodeWithOptions:revOptions
completionHandler:^(NSArray<MapmyIndiaGeocodedPlacemark *> * _Nullable
placemarks, NSString * _Nullable attribution, NSError * _Nullable error) {
if (error) {
NSLog(@"%@", error);
} else if (placemarks.count > 0) {
NSLog(@"Reverse Geocode %@,%@",
placemarks[0].latitude,placemarks[0].longitude);
self.resultsLabel.text = placemarks[0].formattedAddress;
} else {
self.resultsLabel.text = @"No results";
}
}];
let reverseGeocodeManager = MapmyIndiaReverseGeocodeManager.shared
//Or
let reverseGeocodeManager = MapmyIndiaReverseGeocodeManager(restKey:
MapmyIndiaAccountManager.restAPIKey())
let revOptions = MapmyIndiaReverseGeocodeOptions(coordinate:
mapView.centerCoordinate, withRegion: .india)
reverseGeocodeManager.reverseGeocode(revOptions) { (placemarks,
attribution, error) in
if let error = error {
NSLog("%@", error)
} else if let placemarks = placemarks, !placemarks.isEmpty {
print("Reverse Geocode: \(placemarks[0].latitude ?? ""),\
(placemarks[0].longitude ?? "")")
self.resultsLabel.text = placemarks[0].formattedAddress
} else {
self.resultsLabel.text = "No results"
}
}
For more details visit our online documentation.
Nearby Search
For live demo click LIVE DEMO
Search for nearby places in a category near a given location
Nearby Places API, enables you to add discovery and search of nearby POIs by searching for a generic keyword used to describe a category of places or via the unique code assigned to that category.
Class used for nearby search is MapmyIndiaNearByManager. Create a MapmyIndiaNearByManager object using your rest key or alternatively, you can place your rest key in the MapmyIndiaRestKey key of your application's Info.plist file, then use the shared instance of MapmyIndiaNearByManager class.
To perform nearby search use MapmyIndiaNearbyAtlasOptions class to pass keywords/categories and a reference location as parameters to get Nearby search results with an option to pass region in parameter withRegion, which is an enum of type MMIRegionTypeIdentifier. If no value is passed for region, It will take default value which is India.
MMIRegionTypeIdentifier is used to validate and get result for different countries. Currently five countries are supported including India which are Sri Lanka, India, Bhutan, Bangladesh, Nepal.
Additionally you can also set location and zoom in object of MapmyIndiaNearbyAtlasOptions.
Request Parameters
-
page: provides number of the page to provide results from.
-
sort: provides configured sorting operations for the client on cloud. Below are the available sorts:
- dist:asc & dist:desc - will sort data in order of distance from the passed location (default).
- name:asc & name:desc - will sort the data on alphabetically bases.
-
radius (integer): provides the range of distance to search over (default: 1000, min: 500, max: 10000).
-
bounds (x1,y1;x2,y2): Allows the developer to send in map bounds to provide a nearby search of the geobounds. where x1,y1 are the latitude and langitude.
Response Parameters
You will find below useful properties in suggestion object :
-
distance: provides the distance from the provided location bias in meters.
-
eLoc: Place Id of the location 6-char alphanumeric.
-
email: Email for contact.
-
entryLatitude: latitude of the entrance of the location.
-
entryLongitude: longitude of the entrance of the location.
-
keywords: provides an array of matched keywords or codes.
-
landlineNo: Email for contact.
-
latitude: Latitude of the location.
-
longitude: longitude of the location.
-
mobileNo : Phone number for contact.
-
orderIndex: the order where this result should be placed
-
placeAddress: Address of the location.
-
placeName: Name of the location.
-
type: Type of location POI or Country or City.
Code Samples
MapmyIndiaNearByManager * nearByManager = [MapmyIndiaNearByManager
sharedManager];
//Or
MapmyIndiaNearByManager * nearByManager = [[MapmyIndiaNearByManager alloc]
initWithRestKey:MapmyIndiaAccountManager.restAPIKey
clientId:MapmyIndiaAccountManager.atlasClientId
clientSecret:MapmyIndiaAccountManager.atlasClientSecret
grantType:MapmyIndiaAccountManager.atlasGrantType];
MapmyIndiaNearbyAtlasOptions *nearByOptions =
[[MapmyIndiaNearbyAtlasOptions alloc] initWithQuery:@"Shoes" location:
[[CLLocation alloc] initWithLatitude:28.543014 longitude:77.242342]
withRegion:MMIRegionTypeIdentifierDefault];
[nearByManager getNearBySuggestionsWithOptions:nearByOptions
completionHandler:^(NSArray<MapmyIndiaAtlasSuggestion *> * _Nullable
suggestions, NSError * _Nullable error) {
if (error) {
NSLog(@"%@", error);
} else if (suggestions.count > 0) {
NSLog(@"Nearby %@%@",
suggestions[0].latitude,suggestions[0].longitude);
self.resultsLabel.text = suggestions[0].placeAddress;
} else {
self.resultsLabel.text = @"No results";
}
}];
let nearByManager = MapmyIndiaNearByManager.shared
//Or
let nearByManager = MapmyIndiaNearByManager(restKey:
MapmyIndiaAccountManager.restAPIKey(), clientId:
MapmyIndiaAccountManager.atlasClientId(), clientSecret:
MapmyIndiaAccountManager.atlasClientSecret(), grantType:
MapmyIndiaAccountManager.atlasGrantType())
let nearByOptions = MapmyIndiaNearbyAtlasOptions(query: "Shoes",
location: CLLocation(latitude: 28.543014, longitude: 77.242342),
withRegion: .india)
nearByManager.getNearBySuggestions(nearByOptions) { (suggestions,
error) in
if let error = error {
NSLog("%@", error)
} else if let suggestions = suggestions, !suggestions.isEmpty {
print("Near by: \(suggestions[0].latitude ?? 0),\
(suggestions[0].longitude ?? 0)")
self.resultsLabel.text = suggestions[0].placeAddress
} else {
self.resultsLabel.text = "No results"
}
}
For more details visit our online documentation.
eLoc / Place Details
For live demo click LIVE DEMO
The MapmyIndia eLoc is a simple, standardised and precise pan-India digital address system. Every location has been assigned a unique digital address or an eLoc. The Place Detail can be used to extract the details of a place with the help of its eLoc i.e. a 6 digit code.
The MapmyIndia eLoc is a simple, standardised and precise pan-India digital address system. Every location has been assigned a unique digital address or an eLoc. The Place Detail can be used to extract the details of a place with the help of its eLoc i.e. a 6 digit code.
Class used for eLoc search is MapmyIndiaPlaceDetailManager. Create a MapmyIndiaPlaceDetailManager object using your rest key or alternatively, you can place your rest key in the MapmyIndiaRestKey key of your application's Info.plist file, then use the shared instance of MapmyIndiaPlaceDetailManager class.
To perform eLoc search use MapmyIndiaPlaceDetailGeocodeOptions class to pass digital address code (eLoc/PlaceId) as parameters to get eLoc Detail results with an option to pass region in parameter withRegion, which is an enum of type MMIRegionTypeIdentifier. If no value is passed for region, It will take default value which is India.
MMIRegionTypeIdentifier is used to validate and get result for different countries. Currently five countries are supported including India which are Sri Lanka, India, Bhutan, Bangladesh, Nepal.
Response Parameters
In response of eLoc search either you will receive an error or an array of MapmyIndiaGeocodedPlacemark.
-
houseNumber: The house number of the location.
-
houseName: The name of the location.
-
poi: The name of the POI if the location is a place of interest (POI).
-
street: The name of the street of the location.
-
subSubLocality: The name of the sub-sub-locality where the location exists.
-
subLocality: The name of the sub-locality where the location exists.
-
locality: The name of the locality where the location exists.
-
village: The name of the village if the location exists in a village.
-
district: The name of the district in which the location exists.
-
subDistrict: The name of the sub-district in which the location exists.
-
city: The name of the city in which the location exists.
-
state: The name of the state in which the location exists.
-
pincode: The pin code of the location area.
-
latitude: The latitude of the location.
-
longitude: The longitude of the location.
-
placeId: The eLoc or placeId assigned for a place in map database. An eLoc is the digital identity for an address or business to identify its unique location. For more information on eLoc, click here
-
type: defines the type of location matched (HOUSE_NUMBER, HOUSE_NAME, POI, STREET, SUB_LOCALITY, LOCALITY, VILLAGE, DISTRICT, SUB_DISTRICT, CITY, STATE, SUBSUBLOCALITY, PINCODE)
Code Samples
MapmyIndiaPlaceDetailManager * placeDetailManager =
[MapmyIndiaPlaceDetailManager sharedManager];
//Or
MapmyIndiaPlaceDetailManager * placeDetailManager =
[[MapmyIndiaPlaceDetailManager alloc]
initWithRestKey:MapmyIndiaAccountManager.restAPIKey];
MapmyIndiaPlaceDetailGeocodeOptions *placeOptions =
[[MapmyIndiaPlaceDetailGeocodeOptions alloc] initWithPlaceId:@"mmi000"
withRegion:MMIRegionTypeIdentifierDefault];
[placeDetailManager getPlaceDetailWithOptions:placeOptions
completionHandler:^(NSArray<MapmyIndiaGeocodedPlacemark *> * _Nullable
placemarks, NSString * _Nullable attribution, NSError * _Nullable error) {
if (error) {
NSLog(@"%@", error);
} else if (placemarks.count > 0) {
NSLog(@"Place Detail Geocode %@%@",
placemarks[0].latitude,placemarks[0].longitude);
self.resultsLabel.text = placemarks[0].formattedAddress;
} else {
self.resultsLabel.text = @"No results";
}
}];
let placeDetailManager = MapmyIndiaPlaceDetailManager.shared
Or
let placeDetailManager = MapmyIndiaPlaceDetailManager(restKey:
MapmyIndiaAccountManager.restAPIKey())
let placeOptions = MapmyIndiaPlaceDetailGeocodeOptions(placeId: "mmi000",
withRegion: .india)
placeDetailManager.getPlaceDetail(placeOptions) { (placemarks,
attribution, error) in
if let error = error {
NSLog("%@", error)
} else if let placemarks = placemarks, !placemarks.isEmpty {
print("Place Detail Geocode: \(placemarks[0].latitude ??
""),\(placemarks[0].longitude ?? "")")
self.resultsLabel.text = placemarks[0].formattedAddress
} else {
self.resultsLabel.text = "No results"
}
}
For more details visit our online documentation.
Geocoding
For live demo click LIVE DEMO
All mapping APIs that are used in mobile or web apps need some geo-position coordinates to refer to any given point on the map. Our Geocoding API converts real addresses into these geographic coordinates (latitude/longitude) to be placed on a map, be it for any street, area, postal code, POI or a house number etc.
Class used for geocode is MapmyIndiaAtlasGeocodeManager. To create instance of MapmyIndiaAtlasGeocodeManager initialize using your rest key, clientId, clientSecret , grantType or use shared instance of MapmyIndiaAtlasGeocodeManager after setting key values MapmyIndiaRestKey, MapmyIndiaAtlasClientId, MapmyIndiaAtlasClientSecret, MapmyIndiaAtlasGrantType in your application’s Info.plist file.
To perform geocode use getGeocodeResults method of instance of MapmyIndiaAtlasGeocodeManager class which accepts an instance of MapmyIndiaAtlasGeocodeOptions class. To create instance of MapmyIndiaAtlasGeocodeOptions, pass any address as query parameters to geocode.
Request Parameters
-
query: The address of a location (e.g. 237 Okhla Phase-III).
Additionally you can also set some other parameters in object of MapmyIndiaAtlasGeocodeOptions to get some specific results. Which are:
-
maximumResultCount: The number of results which needs to be return in response.
Response Parameters
In response of geocode search either you will receive an error or an array of MapmyIndiaGeocodedPlacemark. Yo will find below useful properties in suggestion object :
-
houseNumber: The house number of the location.
-
houseName: The name of the location.
-
poi: The name of the POI if the location is a place of interest (POI).
-
street: The name of the street of the location.
-
subSubLocality: The name of the sub-sub-locality where the location exists.
-
subLocality: The name of the sub-locality where the location exists.
-
locality: The name of the locality where the location exists.
-
village: The name of the village if the location exists in a village.
-
district: The name of the district in which the location exists.
-
subDistrict: The name of the sub-district in which the location exists.
-
city: The name of the city in which the location exists.
-
state: The name of the state in which the location exists.
-
pincode: The pin code of the location area.
-
latitude: The latitude of the location.
-
longitude: The longitude of the location.
-
formattedAddress: The complete human readable address string that is usually the complete postal address of the result.
-
eLoc: The eLoc or placeId assigned for a place in map database. An eLoc is the digital identity for an address or business to identify its unique location. For more information on eLoc, click here.
-
geocodeLevel: It defines depth level of search for geocode.
Code Samples
MapmyIndiaAtlasGeocodeManager * atlasGeocodeManager = [MapmyIndiaAtlasGeocodeManager sharedManager];
// or
MapmyIndiaAtlasGeocodeManager * atlasGeocodeManager = [[MapmyIndiaAtlasGeocodeManager alloc] initWithRestKey:MapmyIndiaAccountManager.restAPIKey clientId:MapmyIndiaAccountManager.atlasClientId clientSecret:MapmyIndiaAccountManager.atlasClientSecret grantType:MapmyIndiaAccountManager.atlasGrantType];
MapmyIndiaAtlasGeocodeOptions *atlasGeocodeOptions = [[MapmyIndiaAtlasGeocodeOptions alloc] initWithQuery: @"68 mapmyindia" withRegion:MMIRegionTypeIdentifierDefault];
[atlasGeocodeManager getGeocodeResultsWithOptions:atlasGeocodeOptions completionHandler:^(MapmyIndiaAtlasGeocodeAPIResponse * _Nullable response, NSError * _Nullable error) {
if (error) {
NSLog(@"%@", error);
} else if (response!= nil && response.placemarks.count > 0) {
NSLog(@"Forward Geocode %@%@", response.placemarks[0].latitude, response.placemarks[0].longitude);
} else {
NSLog(@"No results");
}
}];
let atlasGeocodeManager = MapmyIndiaAtlasGeocodeManager.shared
// or
let atlasGeocodeManager = MapmyIndiaAtlasGeocodeManager(restKey: MapmyIndiaAccountManager.restAPIKey(), clientId: MapmyIndiaAccountManager.atlasClientId(), clientSecret: MapmyIndiaAccountManager.atlasClientSecret(), grantType: MapmyIndiaAccountManager.atlasGrantType())
let atlasGeocodeOptions = MapmyIndiaAtlasGeocodeOptions(query: "mapmyindia", withRegion: .default)
atlasGeocodeOptions.maximumResultCount = 10
atlasGeocodeManager.getGeocodeResults(atlasGeocodeOptions) { (response, error) in
if let error = error {
NSLog("%@", error)
} else if let result = response, let placemarks = result.placemarks, placemarks.count > 0 {
print("Atlas Geocode: \(placemarks[0].latitude),\(placemarks[0].longitude)")
} else {
print("No results")
}
}
For more details visit our online documentation.
Driving Distance
For live demo click LIVE DEMO
Get driving distance & time from a point to multiple destination
Adding driving distance matrix API would help to add predicted travel time & duration from a given origin point to a number of points. The Driving Distance Matrix API provides driving distance and estimated time to go from a start point to multiple destination points, based on recommended routes from MapmyIndia Maps and traffic flow conditions.
Class used for driving distance is MapmyIndiaDrivingDistanceMatrixManager. Create a MapmyIndiaDrivingDistanceMatrixManager object using your rest key or alternatively, you can place your rest key in the MapmyIndiaRestKey key of your application’s Info.plist file, then use the shared instance of MapmyIndiaDrivingDistanceMatrixManager class.
To perform this operation use MapmyIndiaDrivingDistanceMatrixOptions class to pass center location and points parameters.
To use API Distance Matrix with traffic to get duration inclusive of traffic for a distance between locations use parameter withTraffic as described below:
-
withTraffic: To get distance with traffic pass its value to true, default value is false.
Request Parameters
Additionally you can pass some other parameters to get filtered/specific results. Which are as :
-
routeType: It is type of enum DistanceRouteType.
-
region: It is type of enum MMIRegionTypeIdentifier. It is used to validate and get result for different countries. Currently five countries are supported including India which are Sri Lanka, India, Bhutan, Bangladesh, Nepal.
Note: If you are using Distance Matrix with traffic routeType and region values are not considered. Traffic is only available in India and only optimal route calculation is allowed with traffic.
Request Parameters
In response either you will receive an error or an object of MapmyIndiaDrivingDistanceMatrixResponse where structure of object is as described below:
-
responseCode: API status code.
-
version: API’s version information
-
results: Array of results, each consisting of the following parameters
-
code: if the request was successful, code is “ok”.
-
durations: duration in seconds for source to secondary locations in order as passed.
-
distances: distance in meters for source to secondary locations in order as passed.
Code Samples
MapmyIndiaDrivingDistanceMatrixManager *distanceMatrixManager = [MapmyIndiaDrivingDistanceMatrixManager sharedManager];
MapmyIndiaDrivingDistanceMatrixOptions *distanceMatrixOptionsETA = [[MapmyIndiaDrivingDistanceMatrixOptions alloc] initWithCenter:[[CLLocation alloc] initWithLatitude: 28.543014 longitude:77.242342] points:[NSArray arrayWithObjects: [[CLLocation alloc] initWithLatitude:28.520638 longitude:77.201959], [[CLLocation alloc] initWithLatitude:28.511810 longitude: 77.252773], nil]];
distanceMatrixOptionsETA.withTraffic = YES;
[distanceMatrixManager getResultWithOptions:distanceMatrixOptionsETA completionHandler:^(MapmyIndiaDrivingDistanceMatrixResponse * _Nullable result, NSError * _Nullable error) {
if (error) {
NSLog(@"%@", error);
} else if (result != nil && result.results != nil) {
NSArray<NSNumber *> *durations = result.results.durations.firstObject;
NSArray<NSNumber *> *distances = result.results.distances.firstObject;
NSUInteger pointCount = [distanceMatrixOptions points].count;
for (int i = 0; i < pointCount; i++) {
if (i < durations.count && i < distances.count) {
NSLog(@"Driving Distance Matrix ETA %d duration: %@, distance: %@", i, durations[i], distances[i]);
}
}
} else {
NSLog(@"No results");
}
}];
let distanceMatrixManager = MapmyIndiaDrivingDistanceMatrixManager.shared
let distanceMatrixOptionsETA = MapmyIndiaDrivingDistanceMatrixOptions(center: CLLocation(latitude: 28.543014, longitude: 77.242342), points: [CLLocation(latitude: 28.520638, longitude: 77.201959), CLLocation(latitude: 28.511810, longitude: 77.252773)])
distanceMatrixOptionsETA.withTraffic = true
distanceMatrixManager.getResult(distanceMatrixOptionsETA) { (result, error) in
if let error = error {
NSLog("%@", error)
} else if let result = result, let results = result.results, let durations = results.durations?[0], let distances = results.distances?[0] {
let pointCount = distanceMatrixOptionsETA.points?.count ?? -1
for i in 0..<pointCount {
if i < durations.count && i < distances.count {
print("Driving Distance Matrix ETA \(i): duration: \(durations[i]) distance: \(distances[i])")
}
}
} else {
print("No results")
}
}
For more details visit our online documentation.
Routing
Get optimal & alternate routes between various locations with or without considering live traffic
Routing and displaying driving directions on map, including instructions for navigation, distance to destination, traffic etc. are few of the most important parts of developing a map based application. This REST API calculates driving routes between specified locations including via points based on route type(optimal or shortest) and includes delays for traffic congestion.
Use Directions to get route between locations. You can use it either by creating object using your rest key or use shared instance of Directions class by setting rest key in the MapmyIndiaRestKey key of your application’s Info.plist file.
To perform this operation use object of RouteOptions class as request to pass source location and destination locations and other parameters.
To use Route with traffic based ETA feature, use profileIdentifier parameter of object of ‘RouteOptions’ and set its value to automobileWithTraffic to get route with durations(inclusive of traffic). Parameter profileIdentifier is described below:
-
profileIdentifier: It is instance of enum DirectionsProfileIdentifier which can accept values automobile, automobileWithTraffic. By default its value is automobile.
Request Parameters
Additionally you can set some more parameters on instance of RouteOptions to get filtered/specific results. Which are as :
-
routeType: It is type of enum MapmyIndiaRouteType which can accept values quickest, shortest, none. By default its value is none.
-
region: It is type of enum MapmyIndiaRegionTypeIdentifier. It is used to validate and get result for different countries. Currently five countries are supported including India which are Sri Lanka, India, Bhutan, Bangladesh, Nepal.
Note: If you are using Routing with traffic routeType and region values are not considered. Traffic is only available in India and only optimal route calculation is allowed with traffic.
Steps to get directions
- To get directions create an array of Waypoint class, add two objects of Waypoint class to this array to get route path. For origin position also set heading of instance of Waypoint class.
- Next create an instance of RouteOptions class by passing waypoints created in previous step.
let options = RouteOptions(waypoints: [
Waypoint(coordinate: CLLocationCoordinate2D(latitude: 28.551078, longitude: 77.268968), name: "MapmyIndia"),
Waypoint(coordinate: CLLocationCoordinate2D(latitude: 28.565065, longitude: 77.234193), name: "Moolchand"),
])
- Use Directions singleton class from Directions framework to get available routes.
- You can plot polylines on map for available routes by using Map framework.
Code Samples
Directions.shared.calculate(options) { (waypoints, routes, error) in
guard error == nil else {
print("Error calculating directions: \(error!)")
return
}
if let route = routes?.first, let leg = route.legs.first {
self.currentRouteLeg = leg
print("Route via \(leg):")
let distanceFormatter = LengthFormatter()
let formattedDistance = distanceFormatter.string(fromMeters: route.distance)
let travelTimeFormatter = DateComponentsFormatter()
travelTimeFormatter.unitsStyle = .short
let formattedTravelTime = travelTimeFormatter.string(from: route.expectedTravelTime)
print("Distance: \(formattedDistance); ETA: \(formattedTravelTime!)")
for step in leg.steps {
print("\(step.instructions)")
if step.distance > 0 {
let formattedDistance = distanceFormatter.string(fromMeters: step.distance)
print("— \(formattedDistance) —")
}
}
if route.coordinateCount > 0 {
// Convert the route’s coordinates into a polyline.
var routeCoordinates = route.coordinates!
let routeLine = MGLPolyline(coordinates: &routeCoordinates, count: route.coordinateCount)
// Add the polyline to the map and fit the viewport to the polyline.
self.mapView.addAnnotation(routeLine)
self.mapView.setVisibleCoordinates(&routeCoordinates, count: route.coordinateCount, edgePadding: .zero, animated: true)
}
}
}
For more details visit our online documentation.
MapmyIndia Safety Plugin
Introduction
MapmyIndia Safety Plugin will alerts when a user in or near to a containment zone. If the app is running, a callback method will be called to get the containment zone information. Safety plugin will push a local notification when the user goes in or near to the containment zone, which can be seen from the notification panel.
The library MapmyIndiaSafetyPlugin is part of MapmyIndiaMaps SDK from version 5.7.5. MapmyIndiaMaps can be installed through Cocoapods by adding below line in pod file of project:
pod 'MapmyIndiaMaps', '~> 5.7.5'
Sample
A sample to demonstrate features of MapmyIndiaSafetyPlugin can be found here.
Run pod install or pod update (to update existing pods) command from the terminal after downloading this sample project.
Steps to Integrate SDK in an application
1. Setup Your Project
Below are additional steps you need to follow when you are integrating Mapmyindia Safety Plugin in your application.
-
Create a new project in Xcode.
-
Drag and drop the mapmyindiaSafetyPlugin.framework to your project. It must be added in embedded binaries.
Screenshot:-
-
Configure the location services by adding the following entries to the Info.plist file. locations and motion keys are mandatory.
- Location permissions
- CoreMotion Permissions
Above permissions can be added by using below keys in Info.plist of an application:
<key>NSLocationAlwaysAndWhenInUseUsageDescription</key>
<string>""</string>
<key>NSLocationAlwaysUsageDescription</key>
<string>""</string>
<key>NSLocationWhenInUseUsageDescription</key>
<string>""</string>
<key>NSMotionUsageDescription</key>
<string>""</string>
Screenshot:-
-
In your project settings, go to Capabilities > Background Modes and turn on background fetch, location updates.
Screenshot:-

2. Initialization
To use features of SDK its initialization is required which can be achieved by injecting required MapmyIndia Keys. Keys can be obtained through MapmyIndia's API Dashboard.
To initialize SDK code can be written in AppDelegate file which is the first entry point for an application.
So initialize it in didFinishLaunchingWithOptions function of AppDelegate file before using any feature of MapmyIndiaSafetyPlugin.
To use SDK functionalities you must write import statements as shown below:
import MapmyIndiaSafetyPlugin
import mapmyindiaApikit
func application(_ application: UIApplication, didFinishLaunchingWithOptions launchOptions: [UIApplication.LaunchOptionsKey: Any]?) -> Bool {
// Below is a line of code for requesting permissions for local notifications.
MapmyIndiaSafetyPlugin.shared.localNotificationPermission()
// Below are lines of codes to inject MapmyIndia authorization keys.
// ignore if you are already added these
MapmyIndiaAccountManager.setMapSDKKey("")
MapmyIndiaAccountManager.setRestAPIKey("")
MapmyIndiaAccountManager.setAtlasClientId("")
MapmyIndiaAccountManager.setAtlasClientSecret("")
MapmyIndiaAccountManager.setAtlasGrantType("client_credentials")
return true
}
Below are lines of code to fetch location when an application is in background.
func application(_ application: UIApplication, performFetchWithCompletionHandler completionHandler: @escaping (UIBackgroundFetchResult) -> Void) {
MapmyIndiaSafetyPlugin.shared.backgroundfetch(completionHandler: completionHandler)
}
To initialize safety plugin call initilize method of MapmyIndiaSafetyPlugin class
MapmyIndiaSafetyPlugin.shared.initilize() { (success, onfailError) in
if success
{
// initialization successful
// now you can start plugin
}
else{
// error if any
}
}
3. Start Plugin
The plugin can start to get an alert when the user goes near or in a containment zone. We are providing some method and callbacks handler for getting a response.
The plugin will run in the background as well as in foreground, in the foreground, you will get containment zone info in a delegate method.
Start safety plugin by calling startSafetyPlugin function of MapmyIndiaSafetyPlugin class
MapmyIndiaSafetyPlugin.shared.startSafetyPlugin()
4. Stop Safety Plugin
Stop plugin by calling stopSafetyPlugin of MapmyIndiaSafetyPlugin class
MapmyIndiaSafetyPlugin.shared.stopSafetyPlugin()
5. Current Location Safety
Call getCurrentLocationSafety to check whether it is inside or near to the containment zone.
MapmyIndiaSafetyPlugin.shared.getCurrentLocationSafety()
6. Enable or Disable Local Notification
Enable/disable local notification by calling following lines of code, we are showing local notification when user is inside or near containment zone.
MapmyIndiaSafetyPlugin.shared.enableLocalNotification(notificationEnabled: true)
7. MapmyIndiaSafetyPluginDelegate Protocol
MapmyIndiaSafetyPluginDelegate is a protocol class which have different methods which are called to indicated different states and provide data accordingly.
It has different methods for Success, Failure, Request Started etc.
extension ViewController: MapmyIndiaSafetyPluginDelegate {
func didRequestForContainmentInfo() {
}
func didUpdateContainmentInfo(results: ContainmentZoneInfo) {
}
func didFail(error: NSError) {
}
In success callback which is didUpdateContainmentInfo delegate method an object of type ContainmentZoneInfo is received which have different properties as explained below:
In failure callback which is didFail delegate method error object is received with different error codes as explained below:
-
400 - Bad Request
-
401 - Unauthorized
-
500- Internal Server Error
-
503 - Service Unavailabl
-
In case of API return no Data then Api Message return should be Data Not found.
-
Internet Not available
-
Keys are not set by developer Please contact with the support team.
-
Please add location permissions or coreMotion keys in plist.
MapmyIndia Feedback Kit
Introduction
Feedback Kit for IOS is a wrapper SDK for MapmyIndia's feedback API. It allows developers to integrate feedback module in their application. Using feedback module user can submit location related feedback to MapmyIndia's server.
Note: Sample for UI view controllers with source code is also provided by MapmyIndia which user can directly use to show feedback screen. Information about how to use UI sample is also provided in this documentation.
If you don’t want to implement own logic and use sample from MapmyIndia Jump to Sample UI Kit section.
Setup your Project
Steps to add feedback module into application project:
- Create a new project in Xcode.
- Drag and drop the MapmyIndiaFeedbackKit.framework to your project. It must be added in embedded binaries.
Usage
Steps to submit feedback:
- An authoraization key i.e moduleId (provided by MapmyIndia) against which feedback will be submitted wiil be required to use this SDK .
-
List of categories need to be fetched first under which feedback will be submitted. For more informatatio see here.
Notes:
-
Fetched report categories can be saved for offline use or to prevent fetching report categories multiple times.
-
It will require to separate out them on basis of parentId i.e Separate as Parent and Child Categories, where if parent Id is null means they are parent categories otherwise child of some parent category.
Note: ParentId of a child category is reportId of parent category.
-
On basis of parent and child categories, different User Interfaces or scenarios can be designed as per requirements.
-
User must pass have location oordinate for which feedback will be submitted.
-
After selecting of parent and child category user must take some input as a text for feedback.
-
After Collection all values i.e Module Id, Location Coordinates, Parent Category, Child Category and Feedback Text, feedback can be submitted using functions available in this SDK. See here.
Get Report Categories
Categories for reporting can be fetched using getReportCategories method of MapmyIndiaFeedbackKit class by using shared instance.
In response you will receive an error or an array of MapmyIndiaReportCategories.
Yo will find below useful properties in reportCategories object :
- reportId: Unique Identifier.
- reportName: The name of category to display .
- parentId: Parent Id for report category.
- created: Timestamp .
MapmyIndiaFeedbackKit.shared.getReportCategories { (reportCategories, error) in
if let error = error {
print(error.localizedDescription)
} else {
let categories = reportCategories ?? [MapmyIndiaReportCategories]()
if categories.count > 0 {
print(categories)
} else {
print("No report categories found")
}
}
}
Submit Feedback
To submit feedback on MapmyIndia server you can use saveUserData function of MapmyIndiaSaveUserDataAPIManager class by using shared instance.
saveUserData function will accept an object of MapmyIndiaSaveUserDataOptions class.
To create instance of MapmyIndiaSaveUserDataOptions user must provide coordinate, parent category, child category, feedback text and Module Id(Optional)
In response of submit feedback either you will receive an error or an result object of type MapmyIndiaUserDataInfo. You will find below useful properties in result object :
- dataCount: Count in how much list it exists.
- name: The name of item.
- exist: Integer value which tells is result exist on server.
- id: Unique Identifier.
- listId: Id of list in which it exists.
- time: Timestamp.
- url: URL for reported item
let saveOptions = MapmyIndiaSaveUserDataOptions(coordinate: location.coordinate, parentCategory: parentCategory, childCategory: childCategory, description: self.inputTextField.text ?? "", moduleId: self.moduleId)
MapmyIndiaSaveUserDataAPIManager.shared.saveUserData(saveOptions, { (savedDataInfo, error) in
if let error = error {
print(error.localizedDescription)
} else if let result = savedDataInfo {
print("Feedback submitted: \(result.url ?? "")")
} else {
print("No results")
}
})
MapmyIndia Feedback UI Kit
A UI control MapmyIndiaFeedbackUIKit is available with sourece code to use SDK MapmyIndiaFeedbackKit which is including in sample application project. Sample application project can be download from here.
Usage
MapmyIndiaFeedbackUIKitManager is the class which will help to use this UI Control.Access shared instance of that class and call getViewController method to get instance of ViewController and present or push according to requirement.
CLLocation *location = [[CLLocation alloc] initWithLatitude:_mapView.centerCoordinate.latitude longitude:_mapView.centerCoordinate.longitude];
UINavigationController *navVC = [[MapmyIndiaFeedbackUIKitManager sharedManager] getViewControllerWithLocation:location moduleId:ModuleId];
[self presentViewController:navVC animated:YES completion:nil];
let navVC = MapmyIndiaFeedbackUIKitManager.shared.getViewController(location: CLLocation(latitude: mapView.centerCoordinate.latitude, longitude: mapView.centerCoordinate.longitude), moduleId: ModuleId)
self.present(navVC, animated: true, completion: nil)
MapmyIndiaFeedbackUIKit implicitly use functionalities of MapmyIndiaFeedbackKit module and provides a beautiful user expereience to submit feedback.
MapmyIndia Interactive Layers
Introduction
It is a guide to display Interactive Layers(such as Covid WMS Layers) on MapmyIndia's Map.
In the current scenario, where social distancing is paramount, technology is playing a key role in maintaining daily communication and information transfer. MapmyIndia is serving individuals, companies and the government alike, to spread critical information related to COVID-19 through deeply informative, useful and free-to-integrate geo-visualized COVID-19 Layers in your application.
Following this COVID - 19 guide it will be possible to display different Covid 19 related areas, zone and location on MapmyIndia's Map[1] for iOS. MapmyIndiaMaps SDK for iOS is SDK to display map on iOS platform.
It would be extremely helpful for people who are looking forward to joining offices or visiting markets etc. This tool can help you check the zone and other details of any area.
Getting Started
Get Layers
On launch of MapmyIndia's Map[1], List of available layers can be fetched/refreshed from server by calling method getCovidLayers of map object. Layers can be accessed by property interactiveLayers of map as explained in section Access Layers.
A delegate method mapViewInteractiveLayersReady will be called when it successfully fetches list of layers from server. This method can be accessed by refereing delegate of map object to any ViewController and implementing protocol class MapmyIndiaMapViewDelegate. Go to section Layers Ready Callback for more details.
Map Auhtorizaton
Map Authorization is part of MapmyIndiaMaps SDK. Map will only display if your keys are provisoned to display map.
A delegate method authorizationCompleted from Maps SDK is called onece it checks for Map Authorization.
This delegate method is called when Maps authorization process completes. In delegate method a boolean property isSuccess receives which represents is authorization successed or not.
Note: getCovidLayers function will only work if Map SDK is authenticated. So best place to call this function is in delegate method authorizationCompleted.
- (void)mapView:(MapmyIndiaMapView *)mapView authorizationCompleted:(BOOL)isSuccess
{
if(isSuccess) {
[self.mapView getCovidLayers];
}
}
func mapView(_ mapView: MapmyIndiaMapView, authorizationCompleted isSuccess: Bool) {
if isSuccess {
self.mapView.getCovidLayers()
}
}
Layers Ready Callback
Delegate method mapViewInteractiveLayersReady is called when it successfully fetches list of layers after calling function getCovidLayers.
So get ready your application once pointer comes to this delegate method.
A scenario can be made in application to allow or disallow to access WMS layers using this deleage method. Please see below code for reference:
- (void)mapViewInteractiveLayersReady:(MapmyIndiaMapView *)mapView
{
// Put your logic here to allow to access WMS layers, either by some boolean property or by setting visiblity of a button as it is demonstrated in sample.
if (self.mapView.interactiveLayers && self.mapView.interactiveLayers.count > 0) {
[_covid19Button setHidden:NO];
}
}
func mapViewInteractiveLayersReady(_ mapView: MapmyIndiaMapView) {
// Put your logic here to allow to access WMS layers, either by some boolean property or by setting visiblity of a button as it is demonstrated in sample.
if self.mapView.interactiveLayers?.count ?? 0 > 0 {
covid19Button.isHidden = false
}
}
Access Layers
List of available layers can be accessed using porperty interactiveLayers which is type of an array of MapmyIndiaInteractiveLayer class.
Note: Fetching of list of layers will only succeed if your Authorization keys for map are provisoned to get these layers otherwise this will be an empty list.
NSArray<MapmyIndiaInteractiveLayer *> *interactiveLayers = self.mapView.interactiveLayers;
let interactiveLayers = self.mapView.interactiveLayers
MapmyIndiaInteractiveLayer class has two properties layerId and layerName.
layerId is unique identifier for a layer using which a layer can be shown or hide on map
layerName is display name for a layer which can be used to show in a list or label.
Access Visible Layers
List of available layers can be accessed using porperty visibleInteractiveLayers.
NSArray<MapmyIndiaInteractiveLayer *> *visibleInteractiveLayers = self.mapView.visibleInteractiveLayers;
let visibleInteractiveLayers = self.mapView.visibleInteractiveLayers
Show or Hide Layer
A Covid WMS layer can be shown or hide from map using helper function available.
Show Layer
A Covid WMS layer can be shown on map by calling a function showInteractiveLayerOnMapForLayerId. This function accepts a string value which must be layerId of one of object from list of interactive layers.
[self.mapView showInteractiveLayerOnMapForLayerId:@"pass-unique-layerId-here"];
mapView.showInteractiveLayerOnMap(forLayerId: "pass-unique-layerId-here")
Hide Layer
A Covid WMS layer can be hide from map by calling a function hideInteractiveLayerFromMapForLayerId. This function accepts a string value which must be layerId of one of object from list of interactive layers.
[self.mapView hideInteractiveLayerFromMapForLayerId:@"pass-unique-layerId-here"];
mapView.hideInteractiveLayerFromMap(forLayerId: "pass-unique-layerId-here")
Covid Related Information
On tap on Map object covid related information for visible codvid layers will we fetched from server.
Information from top visible covid layer, will be received in delegate method didDetectCovidInfo, which is part of MapmyIndiaMapViewDelegate protocol class.
didDetectCovidInfo delegate methods will return an object of MapmyIndiaCovidInfo class which can be used to display different information. It will return nil if no info exists.
Map Marker for Covid Related Information
A marker at tapped location can be plotted on map after succesfully query covid related WMS layers.
Marker can be allowed or disallowed to plot on map by setting value of boolean property shouldShowPopupForInteractiveLayer. To allow to show marker set its value to true. By default it is false, means no marker shows on tap of covid WMS Layers.
Below is code for refrence to create a toggle button to enable or disable Covid Marker:
- (IBAction)covidMarkerToggleButtonPressed:(UIButton *)sender {
BOOL newState = !_covidMarkerToggleButton.isSelected;
[_covidMarkerToggleButton setSelected:newState];
[_mapView setShouldShowPopupForInteractiveLayer:newState];
}
@IBAction func covidMarkerToggleButtonPressed(_ sender: UIButton) {
let newState = !sender.isSelected;
covidMarkerToggleButton.isSelected = newState
self.mapView.shouldShowPopupForInteractiveLayer = newState
}
MapmyIndia Safety Strip
Introduction
It is a guide to display a user's safety status for COVID-19 on a map. It will show whether user is in a containment zone or not if yes how much is distance from current location.
Following this guide it will be possible to display user's safety status on MapmyIndia's Map[1] in the form of a safety strip depending upon the user's current location. MapmyIndiaMaps SDK for iOS is SDK to display map on iOS platform.
A method need to be called to check safety status. SDK has inbuild view with button which can be used to call that method.
A sample application project can be found on github by following link: iOS MapDemo.
Note This fetatue is available from version 5.7.8 of MapmyIndiaMaps SDK.
Getting Started
Get Safety Status
After loading of MapmyIndia's Map[1], a mthod can be called to get safety status. showCurrentLocationSafety is the method which helps to find user's safety status. On successfully fetching of status a safety strip will be shown on map.
[_mapView showCurrentLocationSafety];
mapView.showCurrentLocationSafety()
Note: showCurrentLocationSafety will only works if user's location is available. So best practice to call this function when map is ready to show user's location. A delegate method didUpdateUserLocation of map SDK can be used to check when map is ready to show user location.
Safety Strip
On successfully receiving status based on location from server, a view will be shown on map with safety information like distance, containment zone location etc. By default its position will be on top of map.
Safety Strip Position
By default safety status strip will be shown on top of map. But its position can be changed by property safetyStripPosition which is of type MGLOrnamentPosition.
[_mapView setSafetyStripPosition:MGLOrnamentPositionBottomLeft];
mapView.safetyStripPosition = .bottomLeft
Safety Strip Margins
By default margins of safety status is zero. But margins can be set by property safetyStripMargins which is of type CGPoint.
[_mapView setSafetyStripMargins:CGPointMake(0, 30)];
mapView.safetyStripMargins = CGPoint(x: 0, y: 30)
Hide Safety Status
Safety Strip can be hidden from map by calling method hideSafetyStrip.
[_mapView hideSafetyStrip];
mapView.hideSafetyStrip()
Troubleshooting
List of problems related to Map integration:-
Problem 1: Mapbox.framework damaged
Sometimes an error Mapbox.framework damaged shows on opening a storyboard file.
Screenshot:-
Solution:
Use xattr on the framework Throwing the Damaged Error.With the command line you can use xattr to remove error message “mapbox.framework is damaged and can’t be opened. It may be due to application downloaded from the internet. So Launch Terminal and then issue the following command:
xattr -cr /path/to/mapbox.framework
Problem 2: Image not found
Facing the issue of Reason:image not found on launch of application after integrating MapmyIndia's SDK frameworks.
Screenshot:-

Solution:
- First confirm required framework added to your project.
- Go to General tab in project settings and under the section Frameworks,Libraries and Embedded Content select Embed & Sign for each MapmyIndia's framework like MapmyIndiaAPIKit, MapboxDirections etc.
Screenshot:-
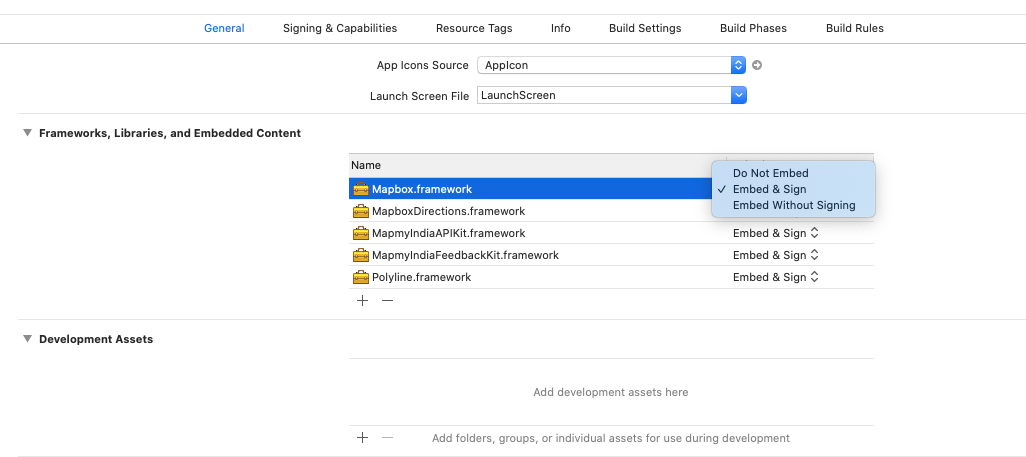
Problem 3: App Store submission with the Maps SDK for iOS
If you have installed the Mapbox Maps SDK for iOS manually, you may see an App Store bug that results in the following error when submitting your application to the App Store:
ERROR ITMS-90087: Unsupported Architectures. The executable for YourApp.app/Frameworks/Mapbox.framework contains unsupported architectures '[x86_64, i386]'
Solution:
To avoid this, you'll need to add the following script in the Build Phases tab of your project. This script will remove architectures for simulators, which is not necessary for App Store submission.
"//Mapbox.framework/strip-frameworks.sh"
Problem 4: PhaseScriptExecution failed
Such types of errors occur due to script failure of the project.
strip-frameworks.sh is a script file, that is embedded in Mapbox.framework and used to remove simulator architectures from the application package.
Below is dynamic path to above mentioned script file:
bash "${BUILT_PRODUCTS_DIR}/${FRAMEWORKS_FOLDER_PATH}/strip-frameworks.sh"
Screenshot:-
Solution:
Initially you can remove the Run Script from Build Phase because it is only required while publishing app on store.
Or
While packaging manually set script path in Build Phase as shown in given screenshot.
Go to project setting click on Build Phase add the Run Script.
Screenshot:-